Monday, June 22, 2009

The first 75 miles

For Father's Day we took a short trip out to Chandler, OK to see Sharla's parents and took the trailer along to stretch its legs. We thought it was appropriate to take the scenic route and drove back and forth along Histroric Route 66. The trailer handled beautifully, some interesting observations.
  • It is narrow, being only 4 feet wide I was surprised how it tucked behind the Explorer so well.
  • It certainly turns heads and it is so fun to watch people chat to their car mates about our pride and joy.
  • It tracked very well, there was no swaying or oscillating.
  • Everything stayed put as it was supposed to.
  • The trip was too short to get a bead on fuel economy, but we are going to take it to St. Louis next weekend when we go to pick up AJ and his cousins.

Here is a picture of the trailer out in the open getting its first breath of fresh air. Along Route 66 is a new landmark a travel spot called Pop's they have hundreds of kinds of soda pop in their iconic bottles. The landmark features a giant pop bottle that is quite colorful at night.

Tuesday, June 16, 2009

Today is the Day

I am happy to report that today is the day that I have finished the trailer. After a very long and hot weekend; tonight after work I was able to get some major things checked off the list. And while there are a few minor details to finish I am for all practical purposes done and the trailer could be put into service immediately.


Choirs of angels singing and bright beams of sunshine beaming down.
Maybe that is to dramatic a mental image but from my perspecctive it is faily accurate. 115 days from the humble beginnings to today. The lights are installed and wired, all the finish is on the exterior, the windows are installed, and the tongue box is completed (Sharla's favorite detail by the way).
You can see that the tongue box is fitted to the curve of the front.

The tailights are set into the bumper.


Here you can see that the cedar stips continue from the beginning of the curve through the roof and down the hatch in the back. Once some of the nit-picky details get finished I will post a video walk-around.

Monday, June 8, 2009

Another weekend has come and gone and while progress was made, it's all the pieces that take more time and don't illustrate much progress. The major accomplishment this weekend was to cut out the doors and fit the windows. In all of my conceptualizing I never anticipated that this task would take an entire day. :-)  If I didn't put as much pressure on myself it would probably be healthier. 

On a separate note. Sharla indulged me and for my birthday present she was willing to camp out with me at the Sprint store Friday night so that I could get a new phone. The Palm Pre was launched on Saturday and I was 6th in line. I have been looking forward to this phone since Jan and am really pleased with it. Thank you sweetie for a wonderful birthday. I hope you feel that yours are just as special.

I will be back on the teardrop next weekend and will have to have everything just about finished up. 

Monday, June 1, 2009

Best Laid Plans...

Well my original goal was to try to get the trailer done by the end of this weekend. You guessed it, this weekend came and went and the trailer is not quite done yet. But I was able to make some progress on Saturday and the results are not too bad.
As far as the trailer goes, there are only 3 major elements left to do.
  1. The side doors need to be built and have the windows installed.
  2. The wiring and trailer lights have to be installed.
  3. The box that will go on the tongue needs to be designed and built.

I have decided that while wooden fenders will be really cool there is nothing keeping me from doing those later. The majority of the frame has been covered and many of the final trim details are done. As it stands I think it will need 2 good days to be finished.


The lower hatch dorrs turned out really well and other than the fact I have run out of copper screw caps, it looks all finished. The trailer lights will be set into the bumper and then the marker lights will be mounted on the sides along the bottom skirt board.


The inside of the galley have been polyurethaned and looks really nice. Notice the paper towel holder.

The Brazilian Cherry laminate flooring has been put installed in the cabin and really finishes off the insterior well.

Monday, May 25, 2009

90 Days feels like a lifetime

We have officially crossed the 90 day mark and after one more weekend we should be finished. It has felt like it has taken 'forever' to get to this point and I keep finding myself recounting the months, cuz it feels like it has taken 6 months instead of just 3.

Ok, for an update... Maybe there should be more progress since my last post, but it's the details that take the most time. The Spar varnish is starting to go on and in some places it's finished after 3 coats. I was hoping to find time to make wooden fenders, but in response to a limited amount of time, I instead painted the metal ones a copper color to better compliment the look of the natural oak and cedar. There will be time for fenders later. If I could just skip working on work stuff, I would have all kinds of time :-) Just kidding Boss. The upper hatch is done, the bracket to hold the hatch up is complete, the trim is on covering most of the red trailer frame. The interior of the cabin has some of the polyurethane on it, the Paper Towel holder is designed and installed (Thank you sweetheart for the design help). Some other little niggly details are finished up as well. And 'Yes Dad" I pulled the bearings and repacked them, I will replace them with Timken's ($$) after the trip.

The porch lights are wired and installed and the latches to hold the hatch closed are installed as well. The frames for the lower galley doors are put together and the panels are glued up. The copper screw caps are installed on the upper hatch and look really cool.
So next weekend I have to put the doors together and install them (in theory the windows arrive on Wednesday). I am in Long Beach and Dallas this week and by the time I get home late on Friday night, I will only have 2 days to finish everything that needs to be done before the maiden voyage starting on the 5th of June.

Saturday, May 2, 2009

Every bit of progress should feel significant

I spent all day in the shop and all I got done was this....
Actually upon reflection, this is significant progress. Today the interior of the roof is sanded, the chase for the electrical was installed and the interior cabinets were completed. As I reflect it was a great amount of progress all before our friends came over for dinner and a movie at the Taylor Cinema. Thanks to Billy, Ashley and Ella for breaking up the frantic pace of this project with a wonderful evening.
Progress for today:
The interior cabinets are finished. The 2 doors on the left and right are for our clothes storage. The 2 drawers left and right are for other stuff. The drawer in the lower center section will be for our laptop, it will drive the monitor that is mounted above. The monitor section is hinged at the top and when open reveals a couple of shelves and valuable storage.


Here the flanking cabinets are open. You can see the storage that is available, each of the shelves are 12 inches deep and 13 inches wide.


Here you can see the chase along the roof for the electrical that runs to the shelf containing the reading lights and outlet above our head when we are sleeping. It is cedar and will tie into the roof nicely. As of now all the electrical (with the exception of the porch lights) is completed and the trailer will be hooked up to "shore power" for the duration of the build. We have a series of busy weeks ahead of us as we have committed to a weekend trip the first week in June and have to be "campable" by then.

Tons left to do... The hatch and lower galley doors, the doors and windows, the skirt around the trailer, the trailer lights, spar varnish, polyurethane, and the wiring for the Explorer. It will be a busy time. Once the whistle sounds at the end of the day, Sharla has given me the clearance to spend as much time in the shop as necessary. She has been amazingly supportive of this project and is even starting to show some enthusiasm towards the finished product. (I think the monitor being installed was the turning point :-) ).

A great day on the slate for tomorrow (Sunday). AJ has a JV Jazz Band concert at the Edmond Arts Festival and then a Oklahoma Youth Orchestra Concert at Putnam City. It will be a musical, action-packed day and any progress I make will be lat in the evening.

Wednesday, April 29, 2009

The First 100 Days

Well I was really proud of myself until I noticed that the last trailer update was on the 11th and here it is 18 days later and I am not nearly as impressed with my progress as I could be I guess. Anyway, here is an update on my measly progress.
The roof is on. All the cedar is attached and half the outside and half the inside are sanded. Sorry about the bad picture but I had just done some sanding before I took the picture. All the exterior skin is on and the vertical trim detail is installed as well.


The framing is completed for the upper hatch. It will hinge at the top and will help to keep the lower doors closed as well. It will get skinned with cedar as soon as I pick up some more lumber. Luckily I am staying fairly close to budget (Sharla skip this part :-) )


The hinge is plastic and continuous so it won't let any water in, and both sides are mounted to some very stout oak. I am sure I have over-engineered this but I would rather be safe and know that it is more than sturdy.


The interior and exterior door trim are finalized and attached. I had to build a couple different jigs to rout the curved pieces for the door frames and the hatch. Those were almost as much fun as the finished results. The trim is cedar and will really pop against the red oak sides. In this shot you can see the shelf that is mounted inside the trailer in the area that will be above our heads. On the shelf are mounted 2 reading lights each with its own switch and an outlet for things like cell phone chargers. In this shot you will notice a green extension cord running to the outlet, this is only a temporary solution until the balance of the interior is sanded and I can mount the chase for the electrical to the inside of the roof.


The shelf is a birch plywood torsion box and has a piece of oak as it's face. All the electrical is installed inside the shelf to make a very clean installation. This shot showcases the fit of all the elements. I am really pleased with the way it is turning out and considering every single piece is from scratch I am surprised that I haven't run into more "opportunities" than I have. But I guess much to Sharla's chagrin, all my "pondering" is not wasted effort. My Lovely Wife and I laid down in the shell with the lights in the garage turned off and the reading lights on; we will have plenty of space and I had a gigantic grin as I thought about how close I am to being finished and how much fun it will be for us to take the maiden voyage. I have a lot to do, but I am hoping that it will start to come together quickly and I will feel accomplished soon.

I think this may be tied for one of the biggest projects I have taken on. A couple of basement remodels and the doors in Xenia would be at the top of that list. But in terms of satisfaction when we are trucking down the road and talking about this project with people, I think this will be very cool. It was funny to watch people driving down the street and see them slow down and look with a puzzled face. But now they come to a complete stop and you can see them mouth "what the heck". I have had people park their car, get out, and chat with me about it, they are amazed. I can only imagine what I will hear as I am proudly standing at my Tiny Trailer at the gas station and the guy next to me asks "So where did you buy that from?" and I can grin and say "Well sir, I actually built it from scratch in about 100 days".

Saturday, April 11, 2009

Great Accomplishments

Well today turned into a great day. After a very slow start and way too much time spent second-guessing my strategy. I finally got motivated and got some things accomplished on the trailer. One of the really neat things that I noticed today, more than any other day is the sheer number of people that slow down as they drive by either to try to figure out what on earth is going on or to check progress. One person squealed their tires slowing down so fast.

One of my happiest additions to the design came today when I finally installed the rear bumper. it is 1 3/4 inch red oak and I added a little bit of adornment.


In the center of the bumper I carved our initials and a heart just like you would carve them in a tree trunk. It is a subtle addition but definitely personalizes this project.


Next came working out the cabinets inside the cabin, the ones that will be above our feet when we are snoring, actually it will probably just be me snoring. :-) There will be a pair of doors, and 3 drawers and then a really cool addition in the center that I will wait to explain when I get it built.


Finally, today I completed the drawer/tray in the galley that the camp stove will be on. This shot shows the drawer stowed/pinned in place.


This shot shows the rig pulled out and the drawer pinned in the open position. This reinforces the planning that has gone into this project. By coming up with this design, even when we are using the cookstove, we still have access to all the drawers, cabinets, and counter space. Now that's thoughtful design.

Saturday, April 4, 2009

Over the past couple of weeks progress has been made primarily in the galley. And as Sharla would say I have spent a lot of time "pondering". Well, except for a few details the galley is finished and I have moved onto the rear bumper, trying to figure out alternative lights, figuring out how I am going to attach the cedar and contemplating a box to put on the trailer tongue to hold firewood and the leveling jacks and whatever else will fit I guess.


As you can see everything will have a place. The wiring is completed and has been tested, the drawers and doors have all been built, and the mircowave is installed and I can already smell the microwave popcorn. :-) Just a couple of details remain, the hinges for the doors need to be ordered and the drawer system/mechanism for the Coleman stove needs some work. The bottom drawer in the middle is for the cookstove propane, the front of that drawer is walnut. The top drawer in the middle is a tall narrow drawer for cooking and grilling utensils primarily, and the front of that drawer is Zebrawood (thanks Dad for leaving me that one when you moved. The gallery rail above the microwave has birch spindles that I have been carrying around for years and it is topped with a piece of mahogany.

Sharla and I went out this morning and found the knobs at Home Depot marked down. The doors and drawers are framed in Red Oak and the panels in the doors are 1/4 Birch Ply. The drawer boxes themselves are all 3/8 inch pine and they are box jointed at the corners with the drawer faces applied to the boxes.

Sunday, March 22, 2009

Today I was able to make great progress. The wiring is in for the exterior lights, and the insulation was glued in, but only after having to go to Lowes and Home Depot. What would a weekend project be without a couple of trips for something.


Shortly after getting the insulation in, the exterior was ready to put on. The outside walls are red oak plywood (1/4 inch) while the interior is birch (also 1/4 inch). I just had to see how she was going to look, so I temp strapped the roof on and bolted the light fixture in. Very cute. The spot in the back will also be covered by red oak ply, but a filler piece of cedar will cover the seam and add a decorative detail tying the roof to the rest of the body. The outside of the trailer will be finished with spar urethane, which will make for a very interesting contrast between the 2 woods.


The galley at the back is starting to come together, there will be a pair of doors at the bottom, these doors will hinge on the sides and will come together in the middle and the hatch over the back will follow the quarter round profile of the trailer and swing up. The space at the bottom on the left is for the cooler, the middle will have a couple of drawers and the space on the right will contain one of our large camping lockers and will also have a pull out shelf for the Coleman camp stove. In the upper portion there will be cabinets, a microwave and some drawers. The wiring that you see is for the porch lights and it will ultimately be hidden in a chase. There is a small push-button switch on the wall next to each door for each outside light.

In the lower galley, behind the middle section where the drawers will go, is the "electrical panel. The GFCI outlet is directly wired to the shore power outlet on the side of the trailer, the oulet strip/surge supressor will add a circuit breaker to the setup and allow for expansion if necessary. We are only wiring for 110 and not adding a 12v circuit, because we are not really interested in outback camping, we are partial to civilization and will likely only camp at "improved" campgrounds with creature comforts like power, water, cable and wifi. :-)

The shore power outlet is on the drivers side, a plug is installed into this cover and an extension cord will provide shore power from the campsite to the electrical panel. In addition to the exterior lights, I am planning on interior reading lights, power for laptop and or a tv, the microwave and assorted outlets for chargers and whatnot. And no, a light isn't being installed on the fender, it is just hangin out there until after the oak gets a couple coats of spar urethane. The shore power hatch will get brass screws once it is ready for final installation.


From Humble Beginnings

For our upcoming trip to Washington this summer we did a huge amount of research about options for camping and how best to wrangle all the kids. There is a bunch of stuff on the web and lots of plans, drawings, opinions, etc. So here is a chronicle yet another epic.

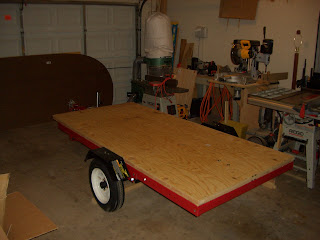
The basic premise of this tiny trailer is based on a stock Heavy Duty Harbor Freight trailer. Once I got the trailer assembled (thanks to AJ for his help, I don't think he knows that there isn't enough room for him to sleep in it yet :-) )

For the floor I used 3/8 CDX and planed down 2x4's to 1" thick, the trailer itself is a standard 4x8, I added about 8 inches of additional length by cantilevering the floor out over the trailer tongue. The Masonite in the background is a preliminary template.


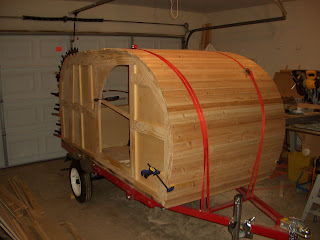
The walls are starting to go up. The walls are yellow pine, the entire frame is glued and pocket screwed together it is quite strong and I figure this will be the heaviest part of the build. A couple of interesting details:
  • The angled piece towards the back of the frame is to accommodate the trailer length of more than 8 feet and plywood coming in just 8 foot lengths.
  • The shape of the door isn't accurate, the gusset hasn't been placed yet.

Even over and above the cantilever, the profile is adding another 5 inches of additional length.


Both walls up... Now it's starting to look like something.


This is the most fun part, the roof and ceiling are typically plywood, but I was going to have no part in that, so after much consideration, I decided to use white cedar and construct the roof much like a barrel is made, using staves. Each strip is slightly beveled and then glued to the adjoining piece. I decided it would be best to build the roof in sections. So far 6 of the sections are made all the way into where the roof flattens out. In this shot, the interior plywood is already installed.
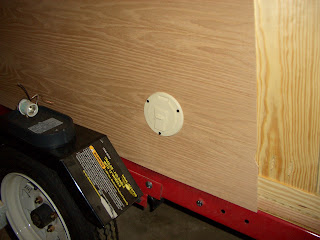